
01. Homepage / 02. Product Management / 03. Search Marketing

The Real Cost of Illinois Basement Water Damage: How Bad Contractor Advice Cost Us $6,200
October 20, 2026
Part One of the Basement Redesign Series: Water Damage, Mold Remediation & Demolition
There are a number of moving parts to refinishing or restoring a basement that aren't often discussed. Why, I've learned? Well, much of this is usually left to two people: the interior designer and the general contractor.
But here's what I'm starting to question. Are you actually getting better results by handing over those responsibilities? Or are you simply paying someone else to make decisions you could make yourself?
If you want to save a lot of money, managing the process yourself is an undertaking. But it's incredibly possible. And we'll get into the total savings over the lifespan of this series.
I consider myself a pretty good designer when it comes to the home. But this will be my first experience taking on several full renovation projects, including general contracting the carpentry work.
Here's the thing: there are plenty of qualified contractors available. I'd recommend carefully vetting their portfolios and even giving them one room at a time to prove themselves worthy of a larger project.
However, if you're new to the process, they could start to take you for a small run.
And I've learned this firsthand. Almost every contractor we spoke to had a different recommendation. Many of which seemed to serve the individual job they wanted to perform rather than the overall NEEDS of the home itself.
Are contractors always giving you the best advice for your home? Or are they giving you the best advice for the work they're trying to sell you?
We spent $6,200 following professional recommendations that ultimately didn't solve the problem. Another year and a half passed, mold continued growing, and the smell throughout the house never really went away.
Eventually, we took control of the process and spent another $4,300 to demolish the affected materials. Within 24 hours of completion, the lingering smell throughout the house was almost completely gone.
That's what this article is really about. Not necessarily how to restore a flooded basement, but how to avoid spending thousands of dollars following advice from contractors who may only be looking at one piece (the one they are incentivized to give you) of a much larger problem.
Because the advice you receive isn't always in your best financial or PERSONAL interest.
Key Takeaways
- Can following contractor recommendations actually cost you more money? Absolutely. We spent $6,200 following professional recommendations that didn't resolve our basement water damage. Another year and a half passed before we took control of the process and spent $4,300 on comprehensive demolition. The lesson? Contractors may be focused on the individual job they're quoting rather than the entire project.
- Should you remove all drywall and insulation after basement flooding? Not necessarily, but I'd lean toward removing all affected materials when there's prolonged moisture exposure or mold contamination. Especially after this situation. How much of what advice you're getting is only to get that "quick buck?" We were repeatedly advised to preserve portions of the basement, including the carpet and drywall. In our case, those partial solutions only delayed the inevitable and added thousands to the final cost.
- Is hiring a remediation company better than managing contractors yourself? Not always. And I'm leaning toward no, in this case. Qualified remediation companies provide valuable specialized services, but we found that much of the proposed work would be subcontracted out anyway. By taking control of the project, vetting contractors, and managing the scope ourselves, we completed the demolition for $4,300. My takeaway? Understand exactly what you're paying for before assuming a larger company will deliver a better result.
The scenario at hand
The scenario at hand is a water-damaged basement. The finished basement flooded. And this mostly happened due to a sump pump failure (a screen was not present in the sump pump allowing a rock to enter into the pump itself and render it useless). As the next rain occurred, so did the water... And I've learned a number of things throughout this process.
Firstly, the home is owned by my mother, who is widowed and not the right person for this type of coordination or commitment.
That became really clear when the initial flood happened. About 2-3" of water actually accumulated and then sat for a number of days.
Insurance wasn't an option because there wasn't coverage for the damage. And the first call was to a local Servpro franchise.
While Servpro gave some good recommendations, ultimately, I wasn't happy with the work.
For someone on a budget, $3,200 is a lot of money to spend on water extraction and drying equipment. It seems most of these companies are out there to capitalize on what they get during the home insurance claim. Which is both not great for the insurance industry, our rates, and ourselves when we're trying to deal with this without coverage.
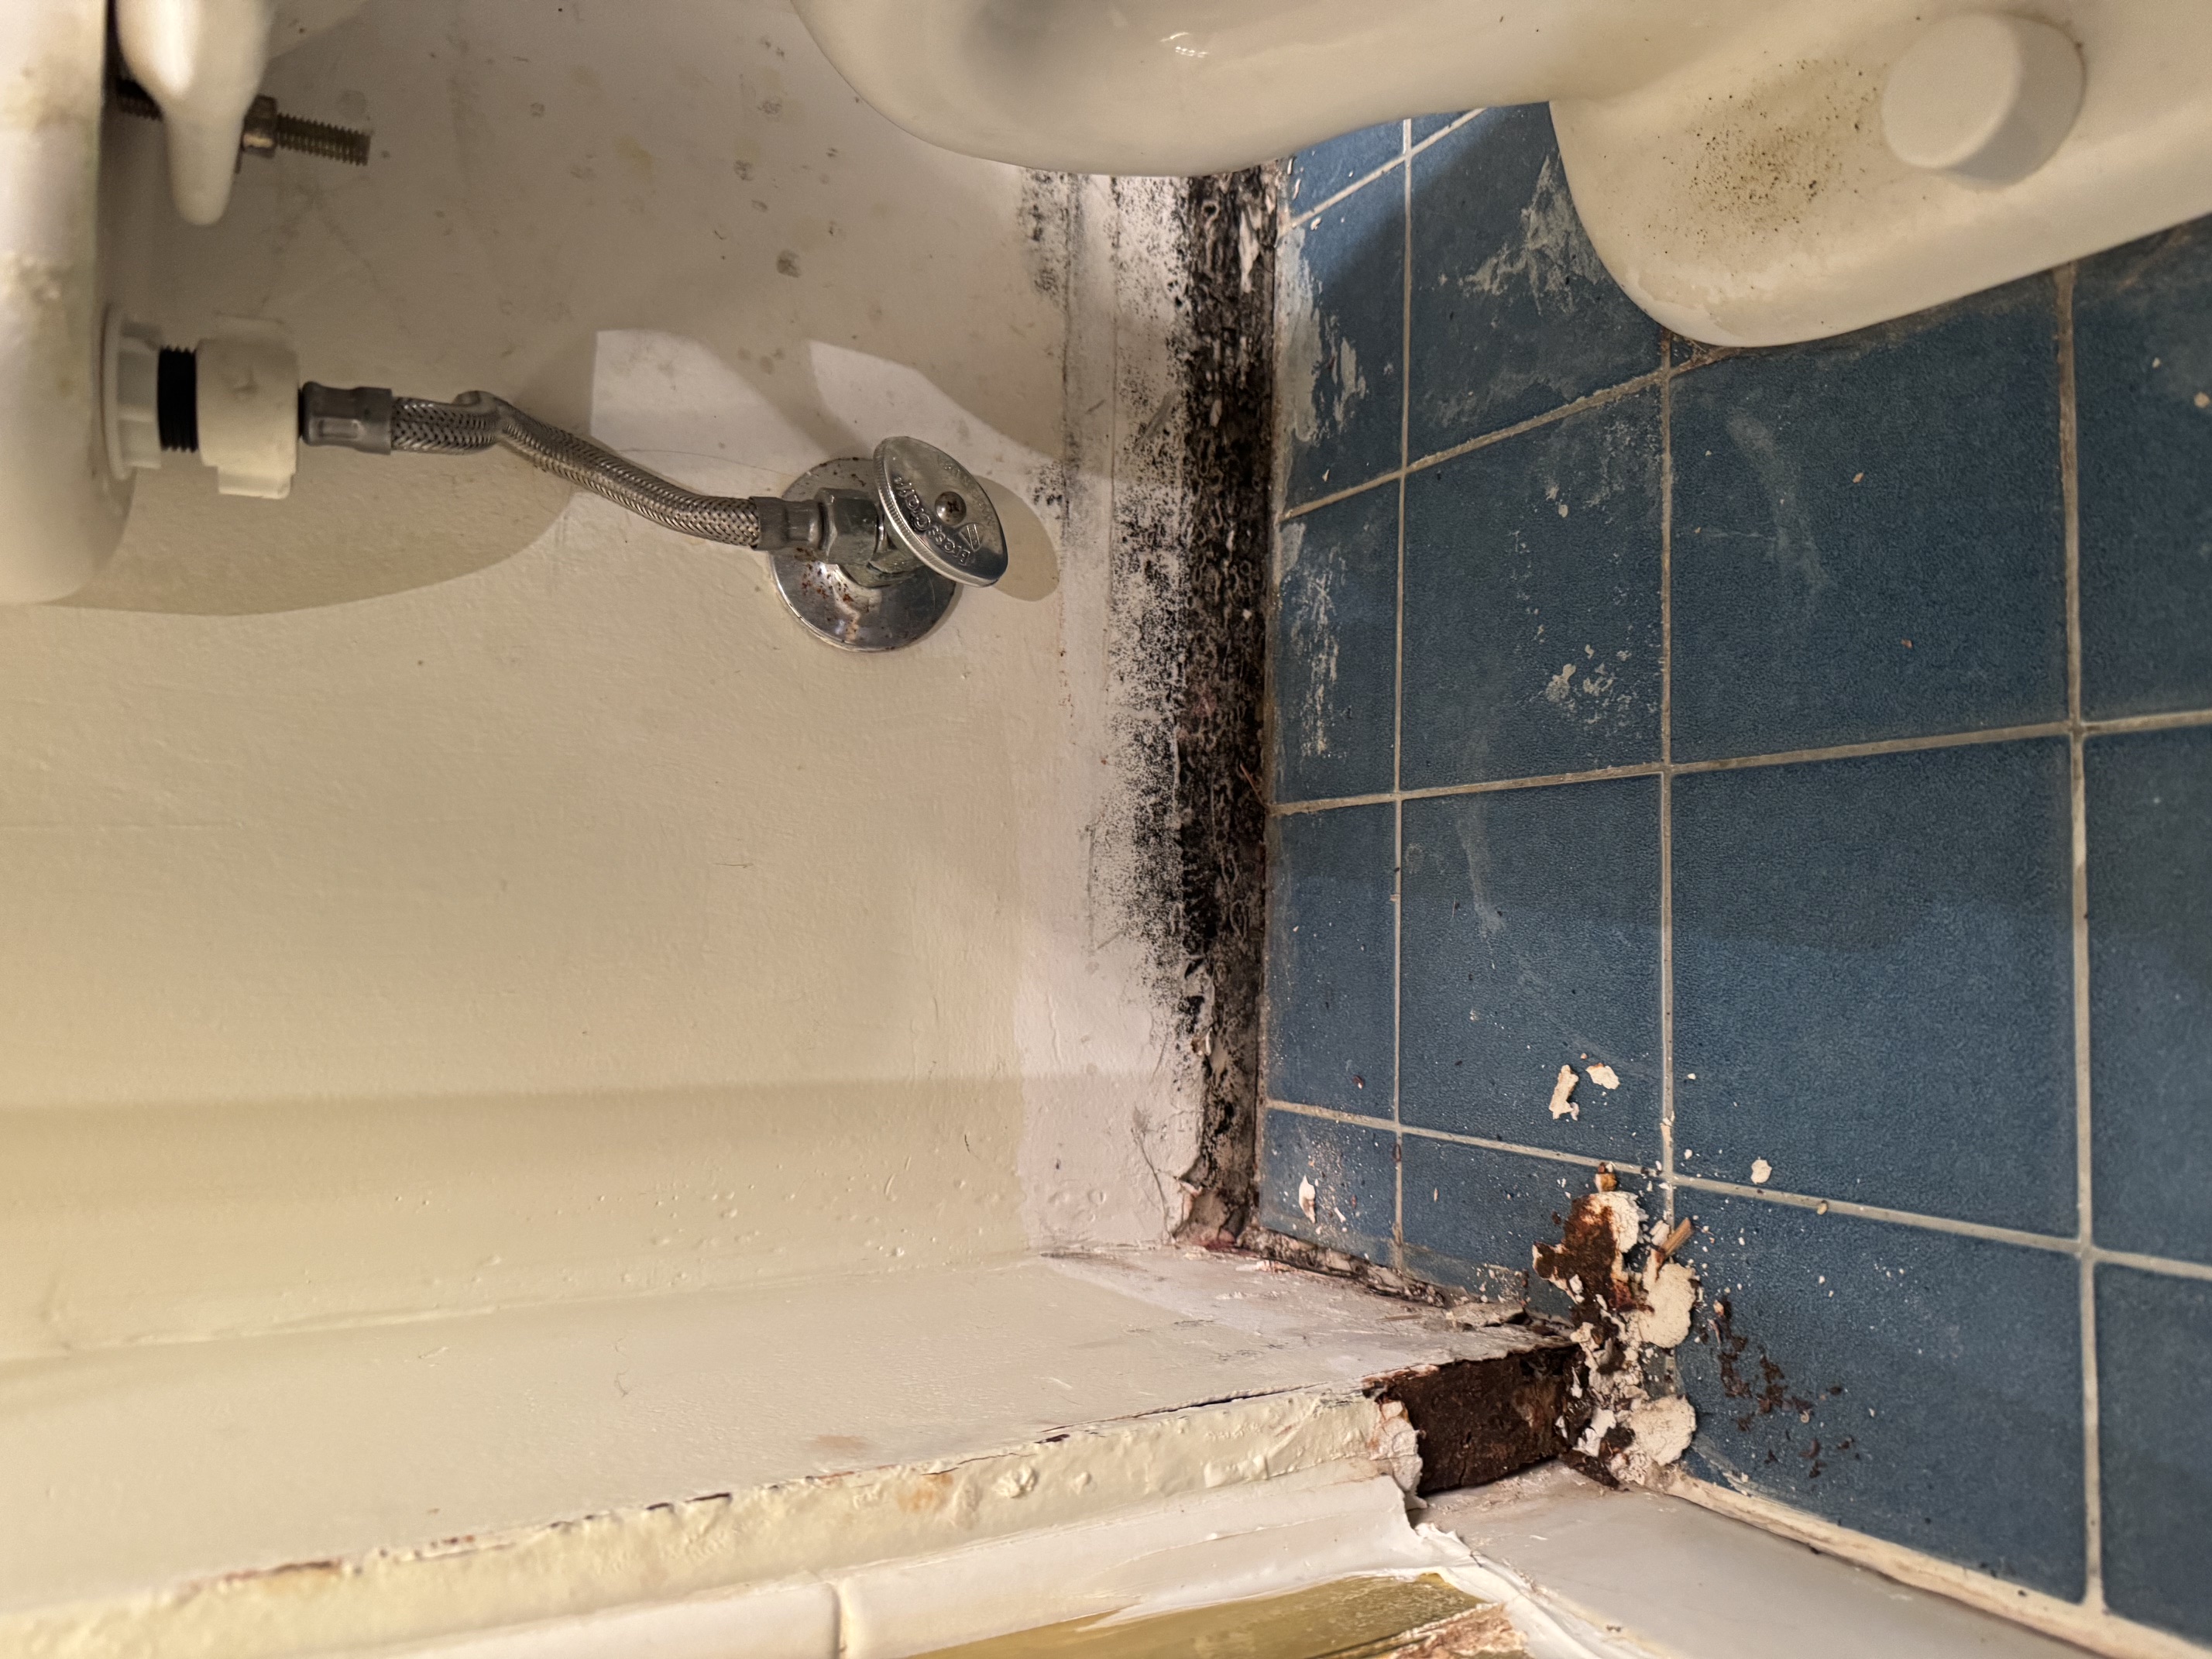
And from what I observed, that's primarily what we received.
That's almost not even worth it.
Sure, you can say that the water is out. But the damage is left behind.
And that's a distinction I wish I'd understood before spending anything.
Water extraction versus water-damage remediation
These are two parts of a larger restoration process, but they're not interchangeable.
We approached the situation as though removing the water meant the basement was on its way to being restored. And that's not really me talking. That's what happens when service people get ahold of a 74-year old woman who doesn't have insurance coverage. They clearly capitalize on the lowest amount of possible work for the highest potential cost they could get out of the situation. And then moved on. This made the "advice" generally what we followed. And it was clearly wrong.
What happened after the initial remediation
The consequences of the poor advice and general situation were incredibly detrimental.
Mold growing behind the walls. The drywall wasn't opened to properly inspect and dry the cavities. No holes had been drilled behind the baseboards for ventilation, and we later found mold in the affected wall materials.
Now, drilling ventilation holes isn't necessarily the correct solution either. In some cases, drywall can be dried in place. In others, particularly when mold has developed, the affected sections need to be removed.
But there needs to be a plan for assessing the conditions behind the finished surfaces.
We didn't have a satisfactory one.
More money to remediate the original problem. Removing the bottom one to two feet of drywall and the affected insulation was going to be another expense. And even then, I was concerned that we weren't addressing the full extent of the damage.
A lingering smell. Perhaps the most frustrating part was the smell traveling throughout the house. We continued trying to preserve the basement while the evidence suggested there was still a moisture or contamination problem.
There was also some idea swirling among different contractors that the carpet "could be cleaned." And this advice came from someone who was helping us with the carpet. Go figure!
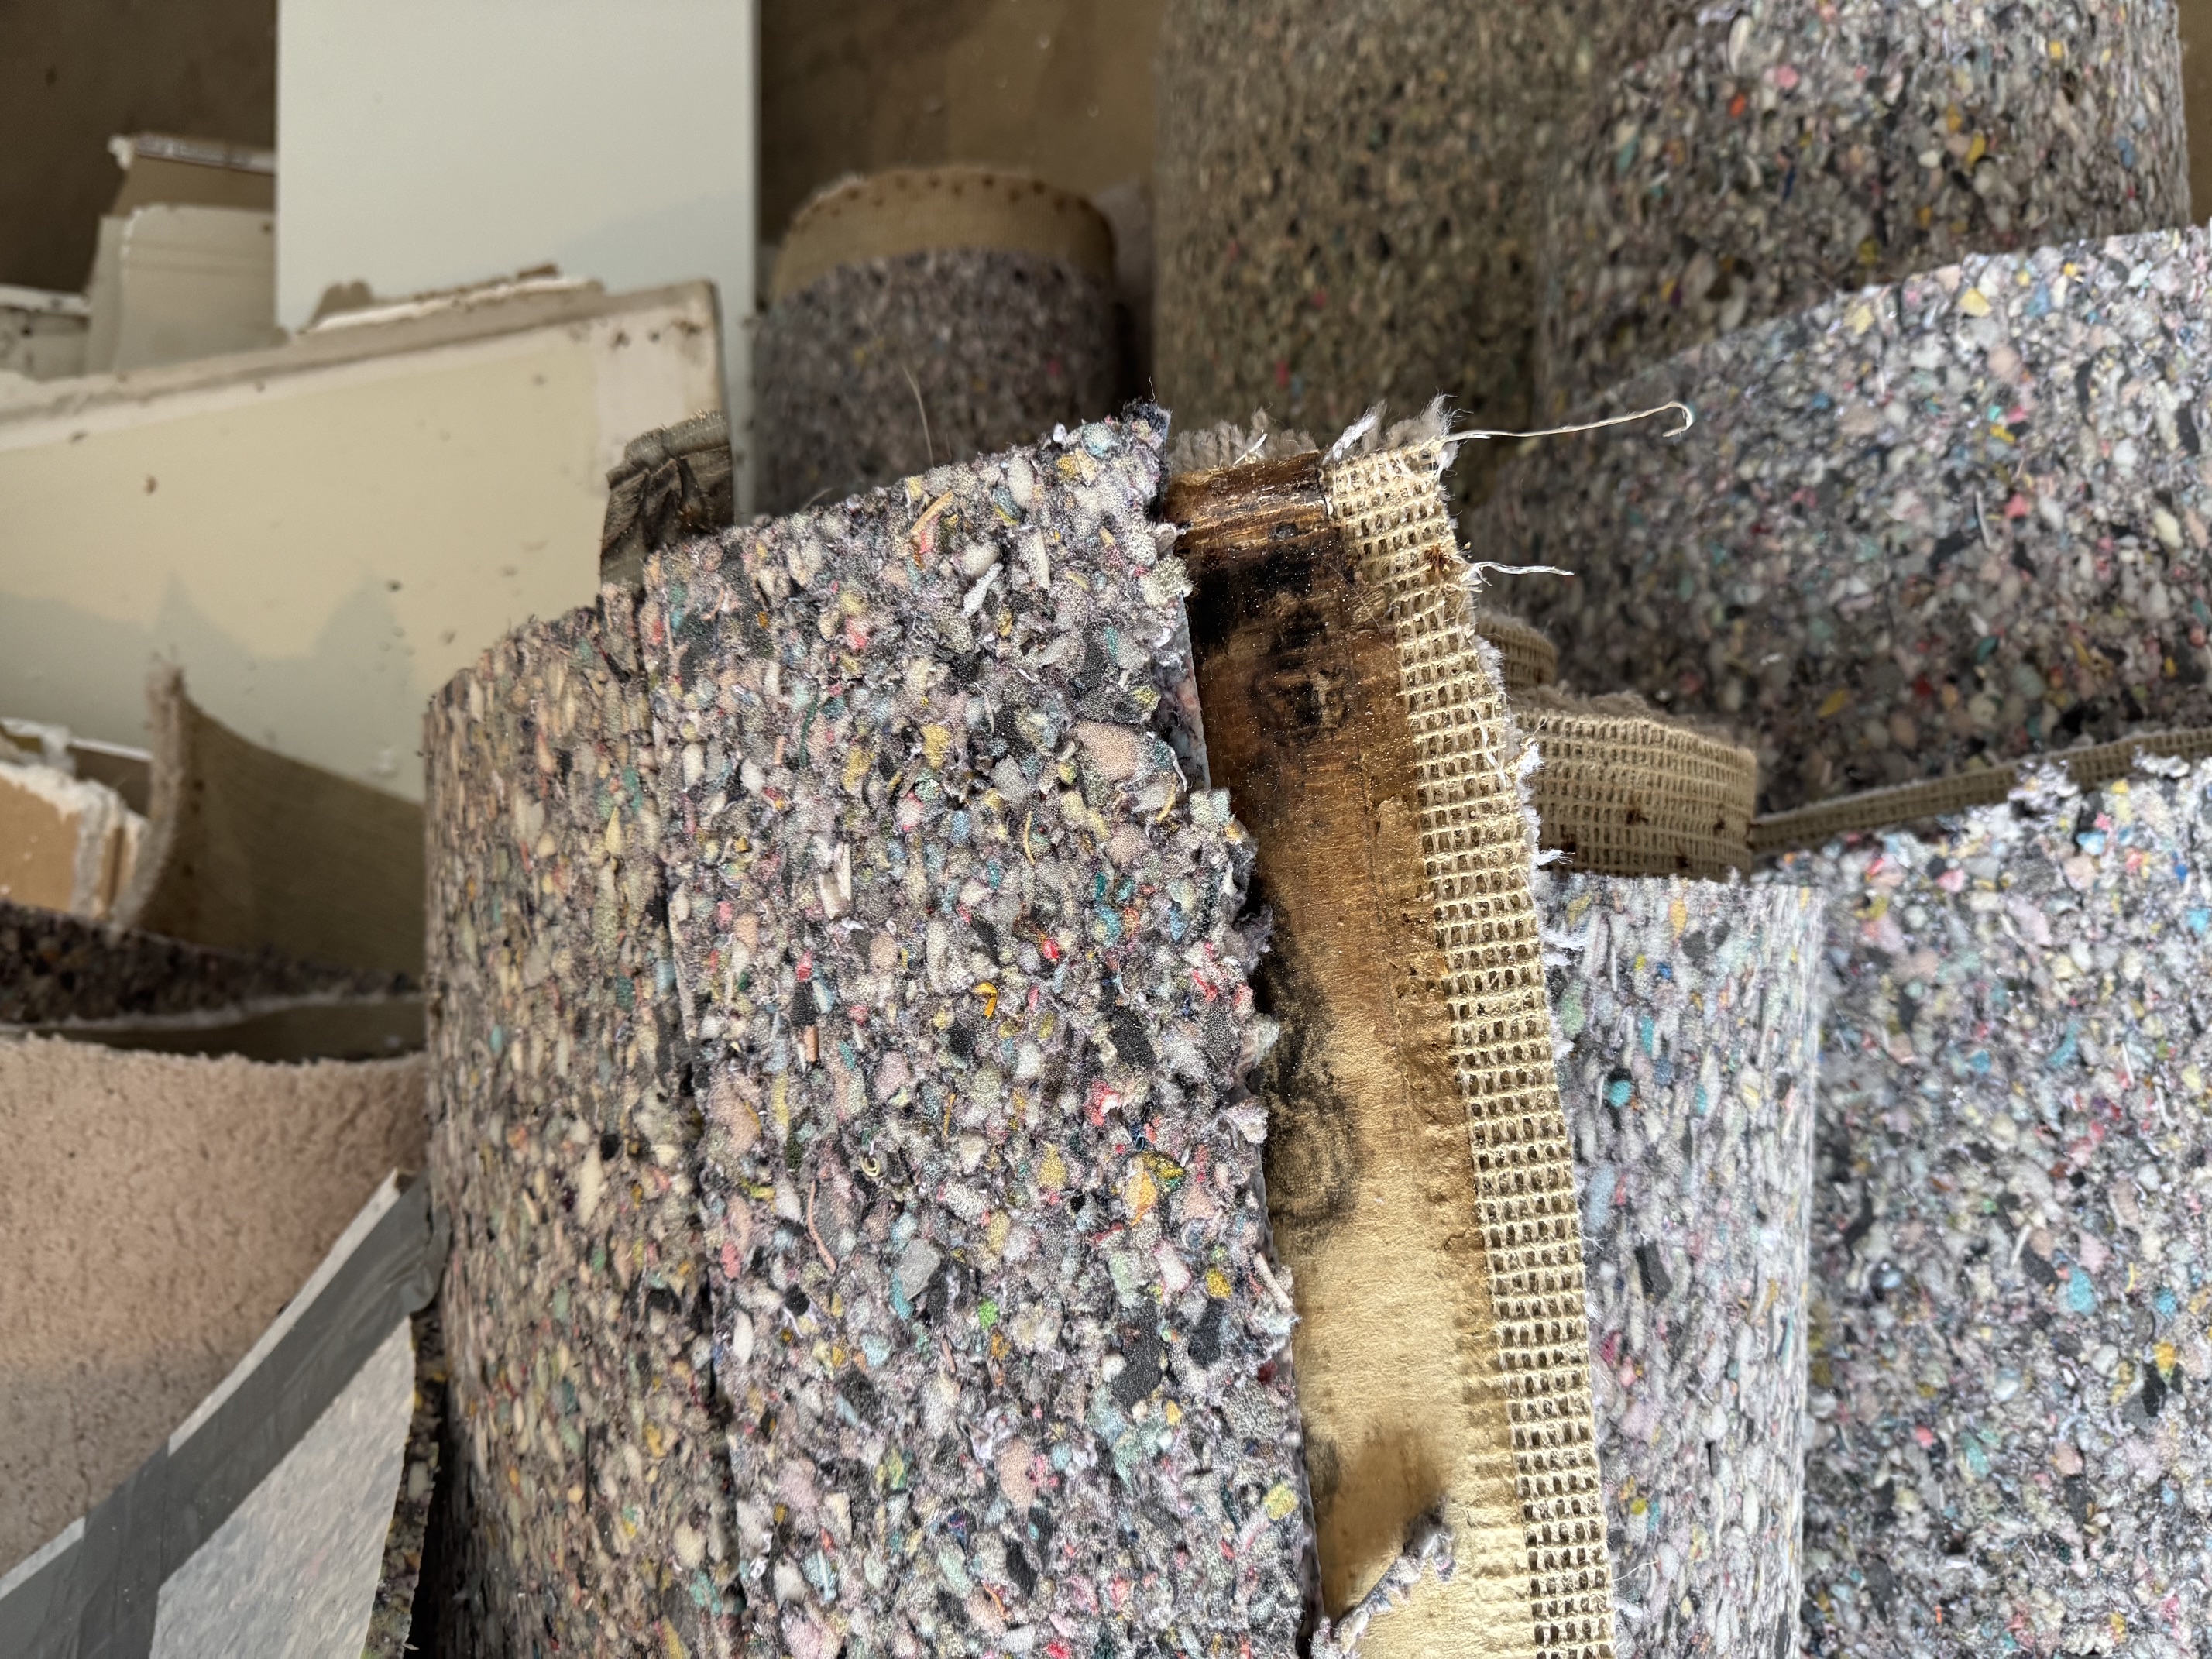
So we tried that approach.
We spent another $3,000 on replacement carpet padding, materials, and labor, while attempting to preserve the existing carpet.
That was a mistake.
After approximately a year and a half, the mold and mildew smell continued, and we still had evidence of mold growth.
It was time to fully resolve this.
What the wrong approach actually cost us
Here's where things became frustrating.
Each contractor seemed to have a recommendation that would save us money compared to a complete demolition. Preserve the carpet. Replace the padding. Remove only portions of the drywall.
And we were relying on these people to tell us what actually needed to happen. But the expenses accumulated. And the advice, despite being presented as a way to save money, ultimately cost us $6,200 without resolving the underlying problem.
Our actual basement remediation and demolition expenses
The $6,200 wasn't a useful investment in the final renovation. It was money spent pursuing an approach that ultimately failed.
And it made the situation worse in the practical sense that we lost time, spent more money, and still had contaminated materials in the basement.
I can't say that every dollar could have been avoided. Some initial extraction and drying work is necessary after a flood.
But I can say that we didn't end up with a satisfactory restoration from those expenses.
We spent nearly 59% of our total pre-reconstruction costs on repairs that didn't provide a lasting solution.
And that changes how I look at contractor estimates.
The least expensive initial approach isn't always the least expensive overall project.
The true resolution: removing the damaged materials
One thing I've learned is that you need to be very careful about what you're trying to save. In fact... I wouldn't even try to save anything. That seems like advice NOT to follow.
Sheetrock, or gypsum drywall, is a porous material. So is fiberglass insulation. These materials behave differently from concrete, ceramic tile, or other relatively moisture-tolerant surfaces. Even when drywall looks reasonably normal from the painted side, that doesn't necessarily mean the material behind it is dry.
Here's something worth considering if your home was built before 2003: the mold-resistant drywall products we're familiar with today may not have existed when your home was constructed.
Our home was built in 1995, when standard gypsum drywall was widely used. While moisture-resistant greenboard was available, National Gypsum didn't introduce its PURPLE XP mold- and moisture-resistant drywall until 2003.
That's an important distinction. The original contractor wasn't necessarily using the wrong material for the time. But homes built before 2003 may have basement walls constructed with standard drywall that offers less resistance to mold and moisture than modern alternatives.
And if you're already opening up those walls after water damage, I'd strongly consider upgrading to a mold and moisture-resistant product rather than simply replacing what was there.
It won't make the basement waterproof. But it's one material choice I'd rather get right while everything is exposed.
Which basement materials should be removed after flooding?
This was something I wish I'd researched more carefully before accepting the initial remediation scope.
The critical detail is the type of water involved.
Clean water from a supply-line failure isn't necessarily equivalent to sewer backup or floodwater containing biological contaminants.
That changes the remediation approach.
The EPA's water-damage guidance and the CDC's flood-related mold guidance are useful references for determining when materials should be dried, cleaned, or removed.
The framing was another concern
While opening up the drywall, we noticed that the previous owners hadn't used pressure-treated lumber for the bottom plates of some framed walls.
For anyone unfamiliar with framing, the bottom plate, sometimes called a sole plate, is the horizontal piece of lumber that runs along the floor and connects the vertical wall studs.
In basements, this becomes particularly important because the framing often rests on a concrete slab.
Concrete can transmit moisture even when there isn't obvious standing water.
For wood framing that contacts concrete, building codes generally require appropriately preservative-treated or naturally durable wood unless a permitted moisture-separation detail applies. In fact, even in 1995, when this original basement was framed and placed up, it was still required. You can see that in the CABO One and Two Family Dwelling Code which was used at that time in Illinois. However, inspection and building processes have evolved a lot since 1995...
It's something I'd pay very close attention to. Did something get missed and is now the time to bring everything up to current codes? Generally speaking, when you embark on this process, you're also embarking on a "bring everyting up to code" process, too.
You don't necessarily need pressure-treated lumber throughout every wall. But the bottom plate and its separation from the slab deserve particular consideration.
And when rebuilding, I'd be looking for lumber that's properly rated for its intended use, rather than just accepting whatever the contractor brings to the job.
We'll get into those material choices later in the series.
What I'd never do again after basement flooding
There are a few things I would approach very differently.
1. Don't replace carpet or padding before determining the full extent of the damage
You're going to spend money on something that doesn't actually resolve the underlying problem.
In our case, that was $3,000.
And that's not an insignificant expense.
Before doing anything with flooring, I'd want to know whether the concrete slab is dry, whether the adjacent walls are affected, and whether the water source has been addressed.
2. Don't assume cutting 12–24 inches of drywall is enough
I've seen plenty of recommendations to cut drywall one or two feet above the floor.
That might be appropriate for some water events. But it's not a universal solution. You need to determine how far the moisture traveled, whether insulation is affected, and whether mold exists beyond the visible damage. Some assemblies may need less removal. Others may require much more.
The only way to truly understand the extent of this is to cut up to the first drywall joint (usually around 48" above the floor) and inspect the entire assembly for what's going on.
3. Don't let contractors quote individual repairs without considering the complete project
This was probably the biggest lesson for me. We paid for initial water extraction. Then carpet padding. Then attempted carpet preservation. And eventually, we still needed to demolish much of the basement. Each decision seemed less expensive at the time.
Collectively, they were not. And each came at the advice of some of the contractors, even carpet installers, and more. The wrong advice in a situation like this is costly. And when it's not covered under insurance, most of the scenario brings in people trying to make a quick few thousand dollars and not actually resolve the situation (at least from what we've experienced).
Demolition: why we decided to remove almost everything
Once we decided to start over, the next question was how much to demolish. Initially, there were several opinions from contractors about what could remain.
The basement also contained a bathroom, including a walk-in shower with a fiberglass base and tile flooring. This complicated the decision. Some contractors suggested leaving portions of the bathroom untouched because they couldn't feel water beneath the tile.
But that's not necessarily a reliable way to determine whether moisture is trapped within an assembly. Ceramic and porcelain tile can tolerate water exceptionally well. However, conventional cementitious grout and thinset mortar aren't waterproofing systems on their own.
The substrate and waterproofing system beneath the tile matter.
For example, a shower built using a properly installed Schluter-KERDI waterproofing assembly is different from tile installed over an unprotected moisture-sensitive substrate.
That doesn't automatically mean every flooded bathroom needs to be demolished.
But it does mean the construction of the assembly needs to be understood before deciding whether it can remain.
For us, removing the bathroom finishes also became a practical design choice.
Why install new flooring throughout the basement, then come back later to demolish the bathroom floor?
You're now paying to mobilize another crew, remove more debris, and potentially damage newly finished surfaces.
And that's where contractors don't necessarily think ahead when it comes to your home.
They're often estimating the specific work you've asked them to do. Not necessarily the larger project you're trying to accomplish.
What our $4,300 demolition included
The team used a rental U-Haul truck to transport the debris, and the entire process involved roughly two to three people working over three days.
That worked out to approximately six to nine worker-days of labor.
The $4,300 was an agreed project price, not an hourly rate. The basement is roughly 900sqft, so this seems absolutely reasonable for the project. Including a larger number of corner cuts that was going to have to be done during the process.
Obviously, this doesn't represent what every basement demolition should cost. The size of the basement, degree of contamination, local disposal fees, and need for professional containment all affect pricing.
But it gives you an actual point of reference from a real project.
And more importantly, it was the first expense that made me feel like we were moving forward.
The result of demolition
The good news was that almost immediately after removing the damaged materials, the lingering mold or mildew smell throughout the house improved dramatically.
Within approximately 24 hours, it was almost completely gone.
That was a pretty significant moment.
After a year and a half of trying to resolve the smell, the biggest improvement came from physically removing the affected materials.
Not replacing carpet padding.
Not running fans.
And not simply spraying chemicals.
Now, I wouldn't consider the disappearance of an odor proof that the remediation was complete. You still need to inspect the remaining materials, verify drying, and correct the water-intrusion source before rebuilding.
But it was the first really noticeable improvement we'd experienced.
Do mold treatments actually work?
One thing I found interesting was how frequently remediation companies discussed treating the walls and wood after demolition.
We heard about different cleaning solutions and preventative treatments.
For our project, the team used a Mold Armor product on portions of the remaining framed lumber as an additional precaution.
But here's what I've learned: a chemical treatment isn't a substitute for physical mold removal, cleaning salvageable surfaces, and correcting the moisture problem.
The EPA doesn't recommend routine application of biocides as the primary method of mold remediation.
That doesn't mean treatment products have no place. It means their purpose needs to be understood.
Commonly available mold treatment products
These are retail product examples, not a list of products we all used. The precise Mold Armor formulation applied in our basement hasn't been confirmed.
I'd also distinguish between disinfectants, surface cleaners, and mold-control products. They're not necessarily interchangeable.
Follow the manufacturer's current label, including surface compatibility, protective equipment, and ventilation requirements. Never combine cleaning chemicals.
And I'd ask a remediation contractor the following:
What are you actually using? What surfaces are you treating? And why is that product necessary?
Because if the answer is simply that it will prevent mold from ever returning, I'd be skeptical.
No surface treatment replaces moisture control.
Remediation companies versus working directly with carpenters
This became another interesting part of the process.
I noticed that some of the remediation quotes we received weren't dramatically different from what a carpentry team would charge for demolition.
In several cases, I also learned that portions of the work would be subcontracted.
That made me question where the expense was actually going.
Were we paying for specialized remediation procedures? Containment equipment? HEPA air filtration? Professional moisture assessment?
Or were we largely paying someone to coordinate demolition and disposal?
Those are important distinctions.
A qualified mold remediation company can absolutely provide value, especially with extensive contamination. Containment, worker protection, air filtration, and preventing spores from spreading into occupied rooms aren't things I'd dismiss.
And a carpentry crew shouldn't be assumed qualified to perform mold remediation simply because they can remove drywall.
But I would still scrutinize the scope.
How I'd compare remediation contractor estimates
This is also where I'd look for experience with recognized restoration practices, including the ANSI/IICRC S520 standard for professional mold remediation.
The EPA's mold remediation guidelines offer another useful reference when comparing scopes.
I wouldn't select a contractor based solely on price.
But I also wouldn't pay a premium simply because someone uses language about safety without explaining the actual methods behind it.
If one contractor is proposing several thousand dollars to remove drywall and insulation, and another is proposing exactly the same work, I want to know what distinguishes them.
That's reasonable.
How we finally took control of the remediation
Looking back, the biggest issue wasn't that we didn't know how to remediate a basement.
It was that we relied on individual contractors to tell us what needed to happen. And each seemed to have a different solution, often involving the specific work they were there to quote.
Eventually, we stopped approaching the basement as a collection of smaller repairs and started managing the entire process ourselves.
That meant identifying everything that needed to come out, coordinating the demolition, and making sure the basement was properly prepared before rebuilding.
And the difference was almost immediate.
I would also avoid ordering replacement materials until the extent of demolition was clear.
Because you're making design decisions without knowing what you're actually rebuilding.
And as we learned, that can get expensive.
What I learned from spending $10,500 before rebuilding
Here's what I would really take away from this whole thing. And how this started a sequence for me.
Firstly, now I'm the general contractor. Anything that requires permits, design, coordination, or material choices is now going through me. Since I can do the research and choose everything appropriately, rather than relying entirely on an interior designer (who I probably wouldn't trust either) or another general contractor who's trying to work too many jobs.
And there's a financial benefit to this. According to Angi's general contractor pricing guide, general contractors typically charge between 10–20% of a project's cost for management. On a $50,000 renovation, that's potentially $5,000–$10,000 in fees that I could avoid by managing the work myself.
The main things I would take away are this:
- The restoration industry seems heavily designed around insurance claims. And as a result, it's clear that when adjusters get involved, projects can get stalled. According to J.D. Power's 2025 Property Claims Satisfaction Study, the average property claim took 32.4 days from filing to completed repairs, while final payments took more than 44 days. Meanwhile, NAHB reported that residential construction input costs increased 4.2% year over year in November 2025. You're stuck between rising construction costs and an insurance process that can take weeks to resolve. As the homeowner, you're left in a terrible situation where delays in addressing water damage could lead to mold and potential health problems.
- Listening to contractors isn't the right move. Vetting them is. When you talk to contractors, know what you're talking about first. Or at least enough to actually quiz them. From there, determine who you're going to work with based on how knowledgeable they are about the situation. Ask about specific materials, installation methods, and why they're recommending one approach over another. Someone who's done something for 20 years isn't necessarily doing it correctly.
- Working with a franchise isn't necessarily a good idea, especially if you're paying out of pocket. Smaller companies are going to know you're paying out of pocket, and suddenly the costs can come down around 40%, at least from what I've found. That's based on the estimates I've received, not an industry average, and you still need to compare the actual scope of work. But it's a significant difference, and one worth investigating before automatically hiring a national brand.
While this is a first journey toward general contracting and interior design for me, the learning is already huge.
And if spending $6,200 in the wrong direction taught me anything, it's that understanding what you're paying for is just as important as finding someone who can do the work.
Now comes the fun part
Everything has been taken apart.
The floors are gone. The drywall has been removed. Much of the basement framing is exposed.
And the next question becomes even more interesting....
How do we put it all back together without repeating the same mistakes?
Well, here's the difference. It's now entirely in my control. Every decision, from the materials we're using to the contractors performing the work, is going to be based on my own research. Not simply what someone recommends because it's the easiest or most profitable approach for them.
That means inspecting the concrete foundation, choosing the correct framing and insulation materials, deciding which drywall belongs in a basement, and figuring out the proper order for reconstruction.
One of my first material decisions was to use Gold Bond PURPLE XP Gypsum Board, a premium mold, mildew, and moisture-resistant drywall manufactured by National Gypsum.
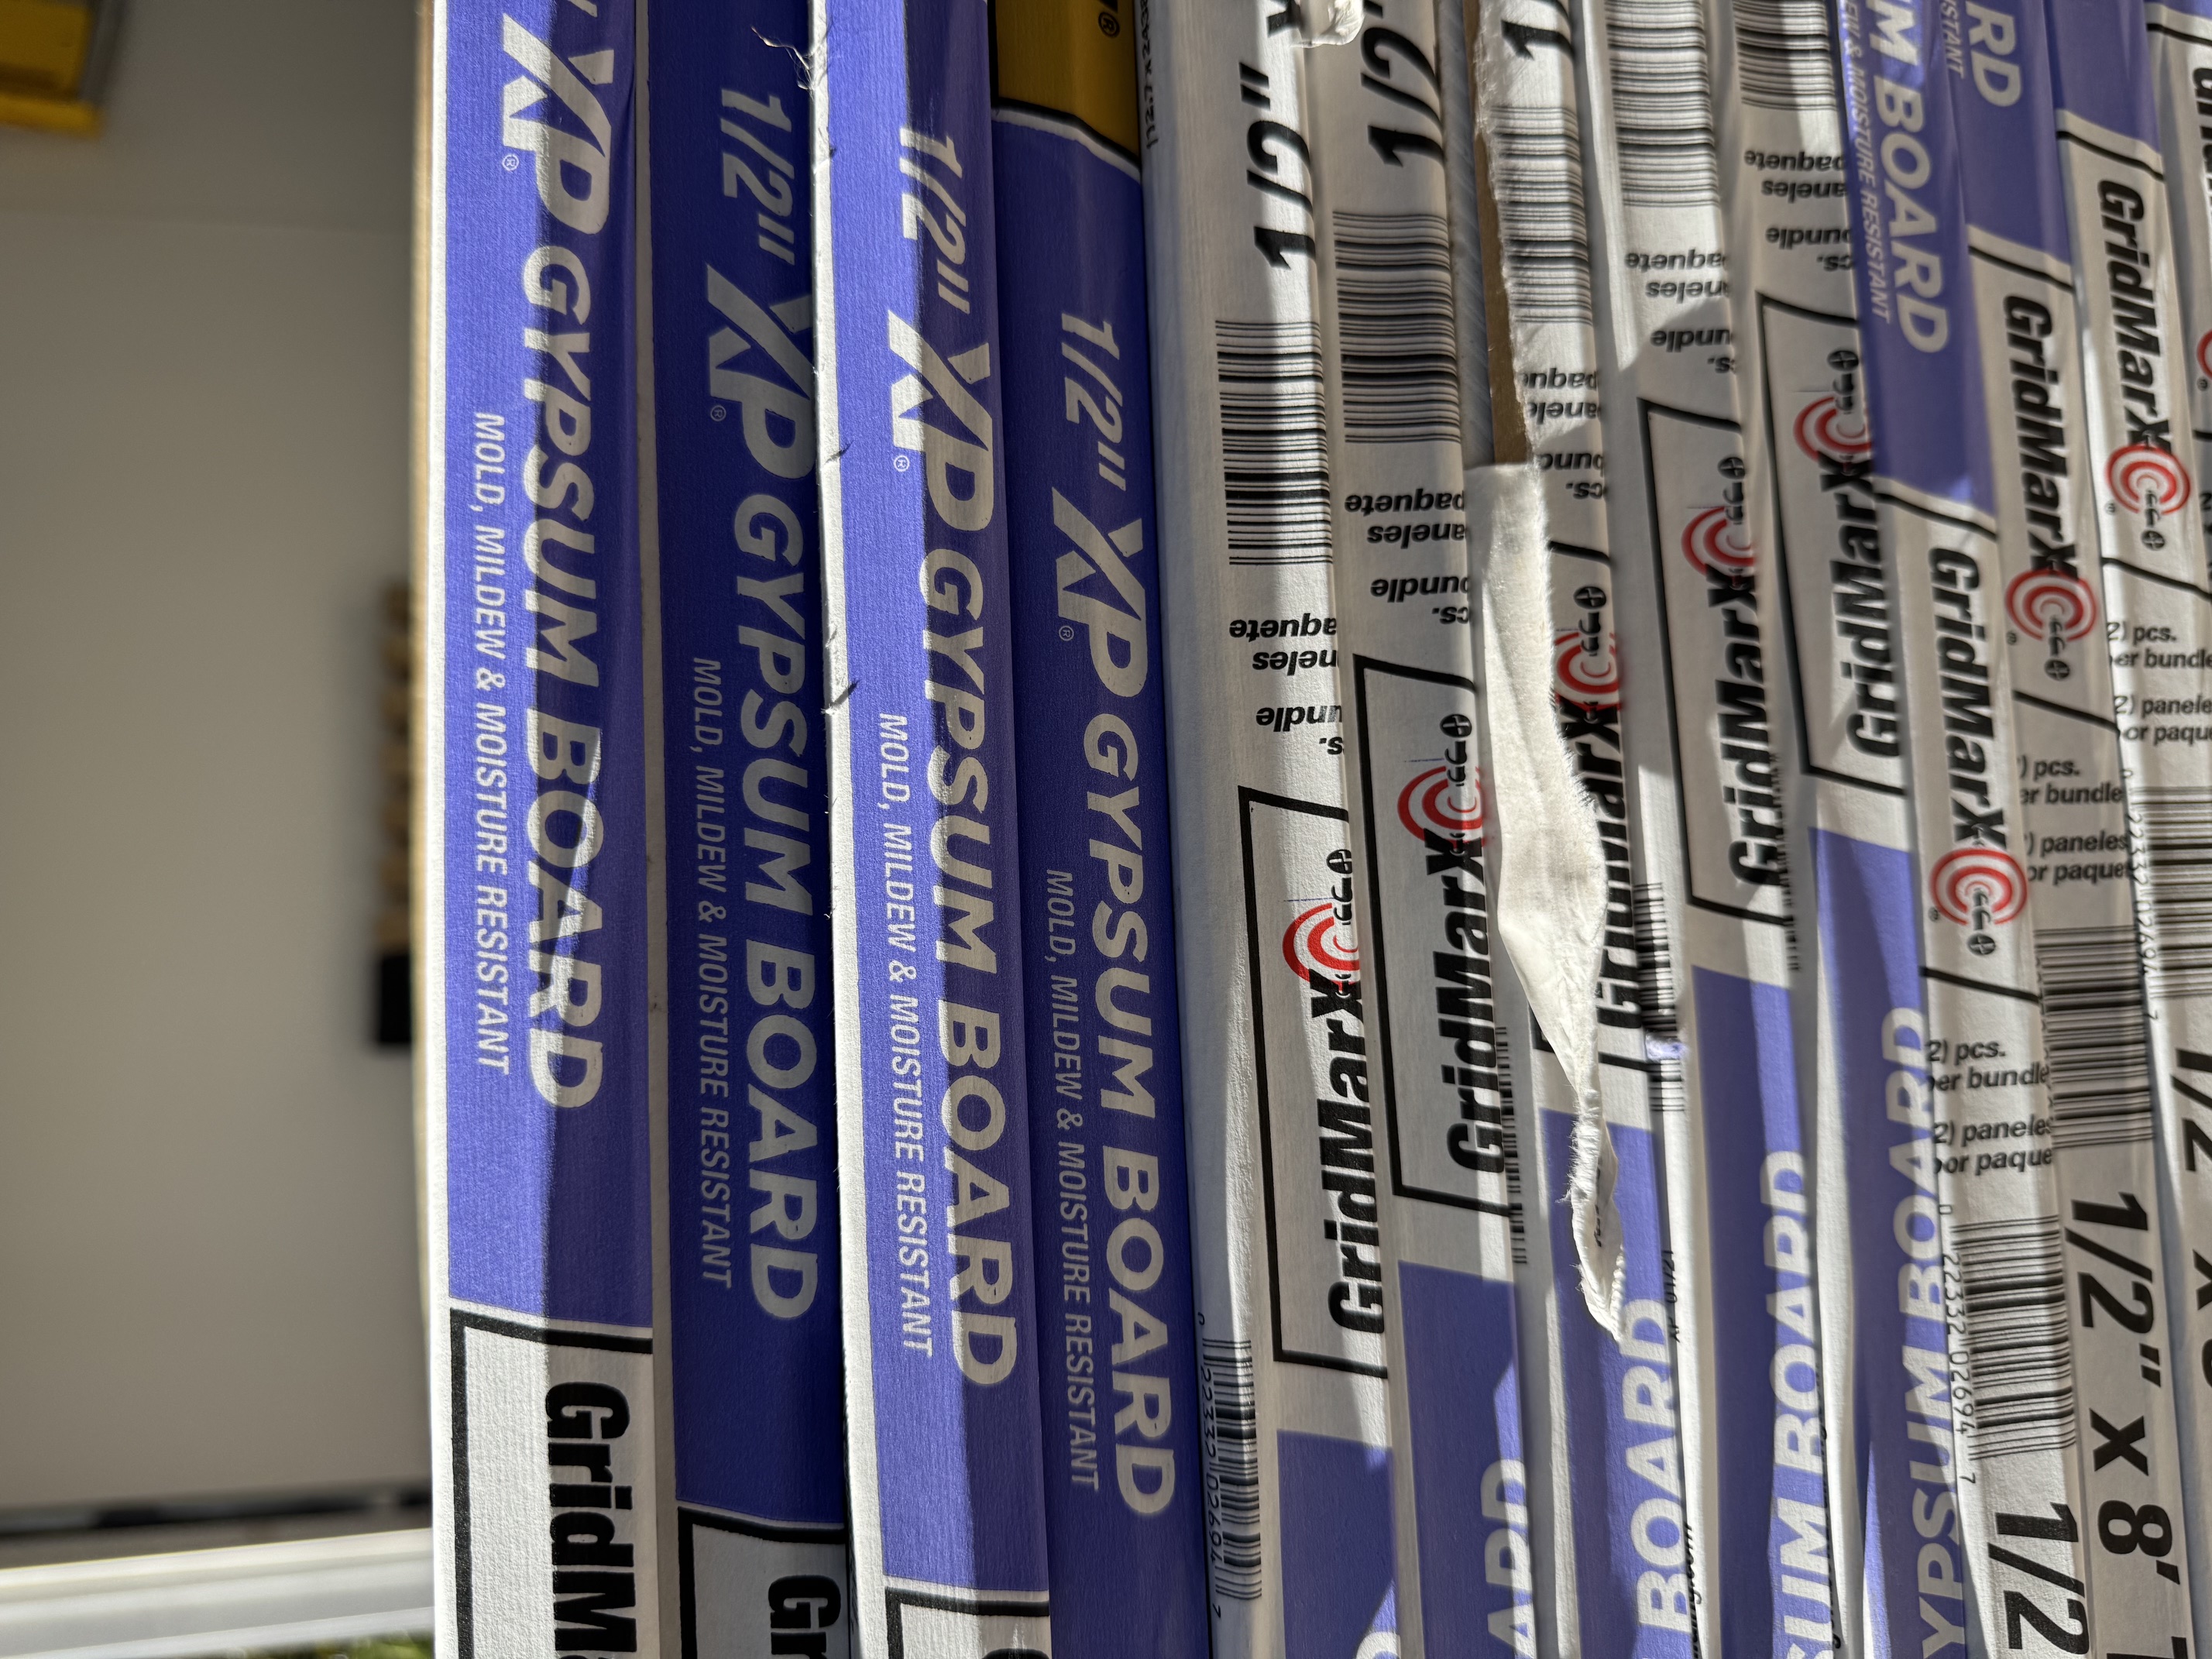
Unlike standard drywall, PURPLE XP uses a specially treated paper facing and moisture-resistant gypsum core designed to provide additional protection against mold and moisture. It also comes with GridMarX installation markings, which help contractors position fasteners during installation.
Here's the product we've selected:
Of course, moisture-resistant drywall isn't waterproof. Another significant water event could still require its replacement.
But that's exactly why I'm taking control of these decisions. I want to understand what each material does, why it's appropriate for this basement, and whether there's a better alternative before approving the work.
And that's going to be the approach throughout the entire renovation.
The contractors will perform the work. But the research, material choices, design, and overall direction will come from me.
Because I've learned that selecting better materials is only one part of this.
The sequence matters just as much.
FAQs
Questions you might have:
Do you need a building permit to replace water-damaged drywall and insulation?
Not necessarily. And this is something I spent time researching before we started rebuilding.
The first thing to understand is the difference between a renovation and a like-for-like repair. If you're removing damaged drywall, insulation, or flooring and replacing those materials in their original locations without changing the structure, layout, plumbing, or electrical systems, your project may qualify as an ordinary repair.
That distinction matters because some building codes exempt ordinary repairs from permits, even when renovations require them.
For example, the International Residential Code (IRC), Section R105.2, identifies certain finish work, including painting, carpeting, and tiling, as permit-exempt. However, removing portions of walls, altering structural framing, or modifying plumbing and electrical systems can fall outside ordinary-repair exemptions.
And here's where things get complicated. Not every jurisdiction adopts the same edition of the IRC, and local amendments can change these exemptions entirely.
How do you research building permit requirements for your own basement?
Here's the process I would recommend before paying a contractor or submitting a permit application.
- Identify your actual building jurisdiction: Start with your property's address and determine whether you're inside incorporated city or village limits or in an unincorporated area. Your mailing address doesn't necessarily establish jurisdiction. Check your county's GIS parcel map, assessor records, or zoning map. Depending on the state, permit authority may rest with a city, village, county, township, or another local agency.
- Find the adopted building code: Search for "[your municipality] adopted residential building code" or "[your county] building permit exemptions." Look for the actual ordinance identifying the code edition. For residential work, this may be an edition of the International Residential Code, sometimes alongside an existing-building code and local amendments.
- Read the permit exemptions, not just the permit application page: If your jurisdiction uses the IRC, look for Section R105.2, Work Exempt from Permit, and the provisions addressing ordinary repairs. Confirm those sections haven't been deleted or modified locally. Also check whether the jurisdiction has separate requirements for demolition, insulation, plumbing, and electrical work.